Upload File in Selenium Webdriver using Autoit
This guide will show you how to Upload File in Selenium Webdriver using Autoit Step by Step guide in a simple manner.
1-While automating web-application many times you will get window-based activity like- file upload, file download pop-up, window authentication for secure sites, etc. In this case, Selenium will fail and will not be able to handle desktop elements.
We can upload files in Selenium using different ways
1- Using sendKeys method
2- Using Robot class
3- Using AutoIT
4- Using WGET
Let me explain to you the easiest way which works most of the time using sendKeys
Syntax
driver.findElement(By.xpath("xpath of any element")).sendKeys("File Path");
Example
driver.findElement(By.xpath("//input[@type='file']")).sendKeys("C:\\Downloads\\Mukesh.png");
or
driver.findElement(By.xpath("//input[@type='file']")).sendKeys("C:/Downloads/Mukesh.png");
Explanation- You do not have to click on file uploader because if you click on the file upload button, it will start file uploader which you need to handle separately.
You can find the locator of the element where the file needs to be updated and then you can pass the file path directly, files can be excel, png or any type depends on your application.
Note- In case of sendKeys method does not work then you can go ahead with all other options.
Introduction to AutoIT tool
1-AutoIt is a freeware automation tool that can work with desktop applications too.
2-It uses a combination of keystrokes, mouse movement and window/control manipulation in order to automate tasks in a way not possible or reliable with other languages (e.g. VBScript and SendKeys).
For more info about AutoIT, you can visit their Official Website AutoIt Official Website

YouTube video for Same
How to write a script in AutoIT?
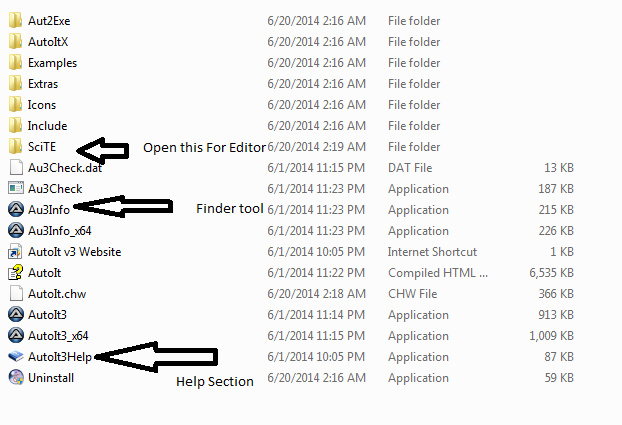
For AutoIt scripting, you should have three things ready.
1-AutoIt Editor- Editor helps us to write AutoIt scripts.
2-Tool Finder – It will help us to identify the element and check their Attributes.
3- AutoIt Help section- This help you to understand about AutoIt functions and what are the parameter it accepts.
Let’s start with Downloading first
Step 1– Navigate to AutoIt official website https://www.autoitscript.com/site/autoit/downloads/ and go to download section or Click here Download AutoIt
Step 2– Click on Download AutoIt and Install
Step 3– Click on Download Editor and Install.

Step 4– Once both are installed in your machine, check all are installed correctly.
Note- Generally it goes to C:\Program Files\AutoIt3 location if you do not change it

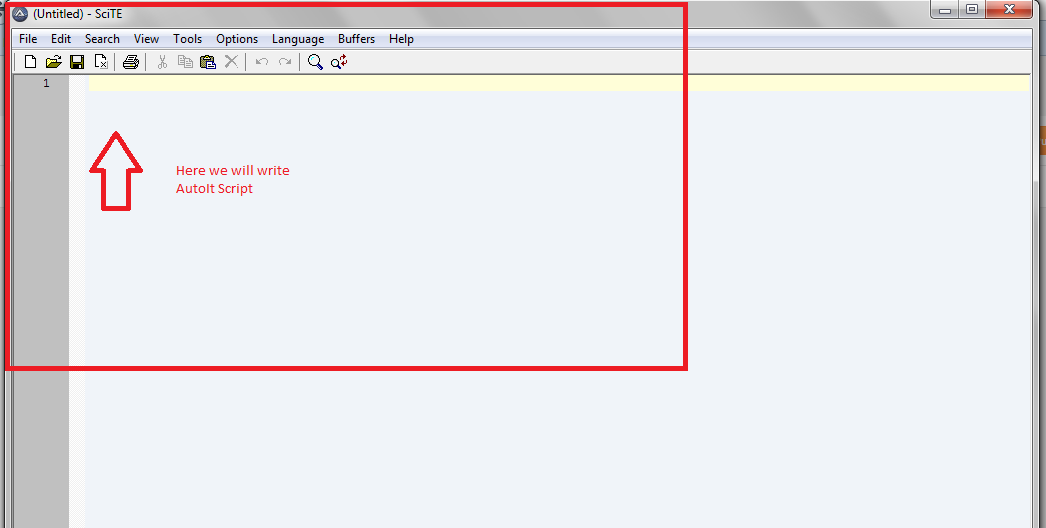
Step5– Open SCiTE folder and Click on SciTE this will open AutoIt Editor

Once all Installed Let’s see how we can write the script.
Upload File in Selenium Webdriver using Autoit
To Upload File in Selenium Webdriver using AutoIt we need to take care of some steps so let’s begin
To upload a file in Selenium Webdriver we will create AutoIT script, which will handle file-uploaded window, and then we will combine Selenium script with AutoIt scripts.
Click on the Upload button you will get a file uploader we will handle the same using AutoIt.
Step 1- Open Editor and Finder Tool


Step 2– We need to write script to upload file so we will use some method of AutoIt.
Each method will have some own functionality
ControlFocus-This will give focus on the window
ControlSetText-This will set the file path
ControlClick-This will click on button
Step 1-
Click on Browse button , a new window will open now open finder tool and Click on Finder tool and drag to the file name as I shown in below screenshot.

This will give all the detail about that window and file name section info; we will use only some attributes like window title, class, and instance.
Open AutoIt Editor and Write Script

In ControlClick method, we will give control id of open button
Step 2-
Save the script to a particular location with some unique name.
Note- By default script will be saved as .au3 extension
Step 3– Now Compile the script so for compiling right click on file and Select compile script this will generate a .exe file of the file.

Step 4- Now write Selenium program and add this .exe file and run your program
Here is the code
package demo;

import org.openqa.selenium.By;
import org.openqa.selenium.WebDriver;
import org.openqa.selenium.firefox.FirefoxDriver;

public class DemoFileUpload {

 public static void main(String[] args) throws Exception {

// This will open Firefox browser
WebDriver driver=new FirefoxDriver();

// This will maximize browser to full screen
driver.manage().window().maximize();

// This will open respective URL
driver.get("your application url");

// This will click on Upload button
driver.findElement(By.xpath("//*[@type='file']")).click();

// This will invoke AutoIT script here give the path of the script
//and this will throw IO exception so u can use throw or try catch
// In my case I am using throws

Runtime.getRuntime().exec("C:\\Users\\mukesh_otwani\\Desktop\\AutoItScripts\\blogUpload.exe");

// Once you will run this program AutoIt script will be invoked and respective f//ile will be attached

  }

}
Thanks for visiting my blog. Please leave a comment below if you are finding any issue while Upload File in Selenium Webdriver using Autoit.
Keep in touch. Have a nice day.
Now if you are comfortable with Basic Selenium, you can check out Advance Selenium Tutorial as well. ?
For More updates Learn Automation page
For any query join Selenium group- Selenium Group
Hi Mukesh,
Why It is working for single run only?
Hi Nilesh,
There is another post that will guide you to upload multiple files using the same AutoIT executable. Here is the link https://vistasadprojects.com/mukeshotwani-blogs-v2/upload-multiple-files-in-selenium-webdriver/
Hi Mukesh,
Thanks for Selenium Tutorial.
Need to know, Through AutoIT while uploading the file can we change the location of the Folder.
Scenario:
When click on the upload file then by default desktop item is displaying but my uploading file is placed on another Location.
So how can we switch the folder from Desktop to other Location??
Hi Ankur,
Please refer https://vistasadprojects.com/mukeshotwani-blogs-v2/upload-multiple-files-in-selenium-webdriver/ where you have to provide full path of file instead of file name.
Hi Mukesh,
My Script
ControlFocus(“Open”,””,”Edit1″)
ControlSetText(“Open”,””,”Edit1″,”C:\Users\naresh\source\repo\QA.png”)
ControlClick(“Open”,””,”Button1″)
My test class runs but execution stops for few seconds at upload button and throws below exception in console and executes all other test cases after this test case.
Exception occured with locator: By.xpath: //*[@type=’file’]
But xpath is correct
Please help.
Hi Sai,
Since I can see xpath which you have used, could please try driver.findElement(by.xpath()).sendKeys() instead of using AutoIT and let me know with your observations
Hi Mukesh,
Below code works for me,
1. driver.findElement(By.xpath(“//*[@type=’file’]”)).sendKeys(“C:\Users\Desktop\QA.png”);
2. elementActions.doSendKeysUsingBySelector(LogoUpload, “C:\Users\Desktop\QA.png”);
Thank you.
However, I would like to get rid of hardpath. My manager should be able to run on his machine. In that case I think I cannot use above code. Hence, I was trying to upload using AutoIT. Could you please help how to overcome such type of issue and what is the best way to avoid hardpath ? Thanks.
Hi Sai,
Better way is to keep these required files into shared folder which should be accessible to everybody or keep these files into some folder inside project folder so that whoever clones project can get these files.
Hi Mukesh,
I figured out. Below code works magically,
public void getLogo(){
String dirPath = System.getProperty(“user.dir”);
String path = dirPath+”\\QA.png”;
driver.findElement(By.xpath(“//*[@type=’file’]”)).sendKeys(path);
}
Thanks for your help.:)
Hi Sai,
Yes, you are partially correct. But how will you deal with file QA.png, will this file available on other machines too. That why, I mentioned to add these files into your project folder.
Hi Mukesh,
I am observing that sometime the exe file run successfully from code and sometime it doesnt, say out of 10 times 4 times it does not run and my test fails.
Is there any way where i can handle this.
Hi Ranjan,
We can’t have control on execution of AutoIt as it doesn’t interact with Selenium anywhere. We have to adjust static time according to application behavior.
I am getting error such as “unkonwn file name”
Hi Sai,
Kindly elaborate scenario.
Hi Mukesh,
Your tutorial is very helpful for me. Thank You!
I am facing an issue below
When an execute my script, it will always navigate file upload page to “Desktop” showing error as “File not found” but
IN AUTOIT script:
I have given attachfile path to “D:\HDimage\profile.jpeg”
Script working fine, if attach file placed in desktop
Hi Siva,
File not found error is thrown by OS. It always happens when the provided path is either wrong or path mentioned in input box is syntactically wrong. Kindly recheck path you have provided.
Hi Mukesh,
Thank you for a quick response
My script:
ControlFocus(“Open”,””,”Edit1″)
ControlSetText(“Open”,””,”Edit1″,”D:\HDimage\profile.jpeg”)
ControlClick(“Open”,””,”Button1″)
My question:
My path: D:\HDimage\profile.jpeg but when clicking upload button, it’s open “Desktop” page.
anything I am doing wrong? please correct me
Hi Siva,
Whatever location gets open by default doesn’t matter. If the absolute path of file is correct and valid then it will go ahead smoothly.
Thank you very much!
Is there something that can be used to drag and drop a file from harddrive/desktop to UI?Just like we can do drag and drop in Gmail instead of clicking on attachment icon?
Hi Neeru,
You can use Sikuli or AutoIT for same. Selenium will help you to do same action inside WebUI only.
How can we parameterize the exe file. I want to set a text in edit box using autoIT and this text is to given by use…Can u help ?
Hi Abhishek,
This post may help you https://vistasadprojects.com/mukeshotwani-blogs-v2/upload-multiple-files-in-selenium-webdriver/
please tell me how handle datepicker
Hi Vasantha,
Please go through this link https://vistasadprojects.com/mukeshotwani-blogs-v2/handle-calender-in-selenium-webdriver/
Hello mukesh sir.
Thank you so much for learn-automation.Its really helpful for me.
Hi harshada,
Thanks for your lovely comments…:)
my machine is 32-bit os ,will autoit support for 32-bit system?
Hi Keerthi,
Yes, AutoIt supports both architectures.
Hi Mukesh,
Your selenium videos are very clear and helpful.
Thank You
Hi Kaur,
Thanks for your overwhelming comment…:)
I have query
can we convert selenium test suite into executable file
so that we can run when ever need
Hi Vidhya,
Yes, it is possible. But you need to wrap drivers and other files also. But managing it will become bit tough.
Runtime.getRuntime().exec(“C:\\Users\\mukesh_otwani\\Desktop\\AutoItScripts\\blogUpload.exe”);
this is not working for me. please suggest
Hi Manjunath,
Did you hardcode file path inside AutoIT script ?
How to attach file in selenium? i tried with the help of robot but it is not working .can u plz tell me different option
Hi Aishwarya,
If I am correct then attach means upload. You can upload file using autoIT. During file upload, when you click on browse button on webpage, it opens a window to select a file. And same window is coming up from OS not from webpage. That’s the reason, for file upload we need to take help of third party tool.
i am unable to click on Browse button in IE11. script is runnig fine in chrome but in IE, it is not clicking on browse button.
Try with CSS
Thank you so much for replying, i was able to click on browse button through js.
Thank you so much once again 🙂
Cheers Deepak
Hi Mukesh,
Your blog and all the selenium videos are really very helpful,they are very clear to understand and easy to learn.
Thank you 🙂
Hey Ritu,
Thanks a ton 🙂 let me know if any help from my side.
Hi,
In your example you worked with Java application. In my case I am working with C#. C# is not accepting this line -> Runtime.getRuntime().exec(” “). Can you give me an alternate solution for this…
Hi,
I have gone through your file uploading concept in selenium. In your example you are uploading file of type .html. Can I able to upload excel sheet to the application? If so could you please explain about that..
how to upload multiple files using Auto-it???
Here you go https://www.youtube.com/watch?v=bQBDARRp9LE
Hi Mukesh Otwani
Thanks for sharing the code.
I tried to edit the code for saving pdf file with “Save As” dialog box in Chrome browser with below code
SaveAs.au3 file
WinWaitActive(“Save As”,””,10)
ControlFocus(“Save As”,””,”Edit1”)
ControlSetText(“Save As”,””,”Edit1″,$CmdLine[1])
ControlClick(“Save As”,””,”Button1″)
Code inside Selenium
Runtime.getRuntime().exec(“C:\\SaveAs.exe”+” “+”D:\\Medical.PDF”);
My above code is not working as system open Save As window but does not pass file name which I provided and thus also does not click on save button.
Can you please tell me where I am making mistake.
Hi Vikas,
Check below article to download files
https://vistasadprojects.com/mukeshotwani-blogs-v2/how-to-download-files-using-selenium-webdriver/
This site is helping me a lot in my work.
Hi Jyothi,
Thanks a lot. Keep visiting and share with others too 🙂
Nice website, which software you used to create it.
Wordpress or created from scratch?
Hi Vicky,
Thanks I am using wordpress theme.
can we do data driven testing with the help of AutoIT incase of fileupload. I want to upload different files for different test cases with selenium webdriver and AutoIT. Is there any chance to do it.
Hi Snehita,
Yes, we can do this through data-driven framework but before running you should know how to pass the parameters to AutoIT Script.
We can parameterize AutoIT script and we can change file name at run time through excel data or static data as well.
Follow below link which will help you to parameterize script
Please try and let me know if you are facing any issue.
Have a nice day 🙂
Hi Mukesh, Can drop the link on how to parametrize autoit script while running it from eclipse.
Thanks in advance
Suresh
Hi Suresh,
here you go
WinWaitActive(“Open”,””,10)
ControlFocus(“Open”,””,”Edit1″)
ControlSetText(“File Upload”,””,”Edit1″,$CmdLine[1])
ControlClick(“File Upload”,””,”Button1″)
Runtime.getRuntime().exec(“C:\\path-of-exefile\\dummy.exe “+” “+”C:\\file-to-upload\\1.PNG”);
Hi Mukesh, Thanks for the provided information on this. I tried below command
Runtime.getRuntime().exec(“C:/AutoITScripts/pdf.exe”+” “+”Opening pricing.csv”)
and printed the values on the message box.
Actual Output is as follows:
$CmdLine[1] is Opening
$CmdLine[2] is pricing.csv
However since it is one value, expect the value “Opening pricing.csv” to get assigned to $CmdLine[1].
Any comments on this as to why this value is getting splitted despite it is provided within the double quotes.
Thanks in advance
Suresh
Hi Suresh,
Path does not contain any spaces so while giving path for a specific file make sure it does not contain any spaces.
bookmarked!!, I really like yojr website!
Thank you Thao 🙂
Hi,
Thanks a ton. I am glad that you liked above post 🙂
Usually I do not learn article on blogs, however I would like to
say that this write-up very forced me to take a look at and do so!
Your writing style has been surprised me. Thanks, very great post.